I'm a true Christmas lover, so today's post is a tribute to Christmas, in a way.
I truly love Christmas and look forward to it from December 26th, but when it comes to cardmaking, I really prefer to follow the seasons, so Christmas in July is not really my thing, or I thought!
But when you're given such a beautiful release to play with, it no longer matters that it's 36°C outside (even if you have to hot foil!).
Thank you @alexsyberiadesigns for having me as a guest designer on this beautiful release. I had an amazing time creating all of the cards and in particular this mini album, which is also a sort of tribute to the brand, as it has so many sets from the previous releases.
Front and back covers

For the front and back cover, I used the new Festive poinsettia set, with some mirror stamping for the back cover. When I say mirror stamping, I have to explain what that is for me (LOL). If like me you struggle to get a crisp image with mirror stamping, I have a little trick which works great for me. All it requires is a light board, which must be the most inexpensive appliance in my craftroom (my heat gun cost me more)! So, what I do is I basically stamp the image the regular way, then I flip the paper and I go over the image from the back with a Copic liner (you need to choose the right liner depending on your coloring medium). The light board makes it really easy to see the stamped image at the back and when time comes to die cut the image, it's also very easy, because you can use the stamped-image side to position the die correctly.
I then die cut all pages of the mini album with the coordinating die, to have a shaped album. I trimmed the left side to allow pages to turn. I used my We R Memory keepers Crop-A-Dile multi punch to punch 3 holes on each page after I glued the front and back together. For the font and back covers, I added an extra piece of heavy cardstock for extra sturdiness between the 2 sides. To keep the mini album together, I used a 3-ring binder. I also used an eyelet die to create contrasting eyelets on all pages either from inked panels or specialty cardstocks.
I colored the poinsettia with Copic markers. The sentiment on the front cover is a mash up from several stamps as described below
Products:
Festive poinsettia (image and Christmas sentiment)
Always be yourself (sentiment Darling)
Sunkissed memories (sentiment Thank you for brightening my life)
Christmas in July


The first page is by the beach and features some goodies from the previous release. For the Tiki bar, I used a square and rectangle dies to create the booth. For the wood effect, I dabbed Distress oxides directly onto paper by drawing long lines. I started with Tea-dye, then added Vintage photo and a little bit of Ground espresso. I really like how it gives that wood veins effect, leaving some white from the page underneath. I also used a scrap to create the Chill out sentiment with embossing powder. The sentiment is from the Sunkissed memories set and was very useful to hide the ends of the foliage underneath, stamped from the Giraffe-ic friends set.
The background was inked with Distress oxides: Scattered straw and Tea-dye for the sand, Salvaged patina and Salty ocean for the ocean, and Speckled egg and Salty ocean for the sky.
I added a few highlights in the sea with a white gel pen, and some foam where the sand and sea connect.
To make the scene a little bit more wintery, I added a few wool caps and snowflake from the Falala friends stamp set. For the sentiment, I had to use a bit of creativity, pulling the word "in" from the "Thinking of you" sentiment of the Tulips treasure set, and the "July" word from the Spring garden set, stamping 2 sentiments: JUst a hello and I simpLY miss you
Products:
Pengu-tastic friends (drink, palm tree, penguin)
Falala friends (wool caps, snowflake)
Paradise birds (flamingos)
Giraffe-ic friends (foliage)
Underwater wonders (crab)
Festive poinsettia (Christmas sentiment)
Tulips treasure (Thinking of you sentiment: "in")
Spring garden (July sentiment from JUst a hello and I simpLY miss you)
Sunkissed memories (Chill out sentiment)
Peace and Joy


For the background of this page, I first die cut a circle from masking paper and masked the moon area. I then blended Distress oxides Tumbled glass, Salty ocean, Chipped sapphire and Black soot and then splattered some Copic opaque white. I then watercolored the moon with Distress inks Squeezed lemonade, Pumice stone and Iced spruce, making random spots around the bottom part.
The images are from the Falala friends, Always be yourself and Birthday wonderland sets. I stamped the sentiment from the new Christmas sentiments set and heat embossed it with white powder.
I adhered the images with 3D foam and then added some snow effect here and there with a snow pen.
Products:
Falala friends (sled, Christmas caps and gifts)
Always be yourself (unicorns)
Birthday wonderland (Santa bear)
Christmas sentiments (Peace and Joy sentiment)
Candy canes

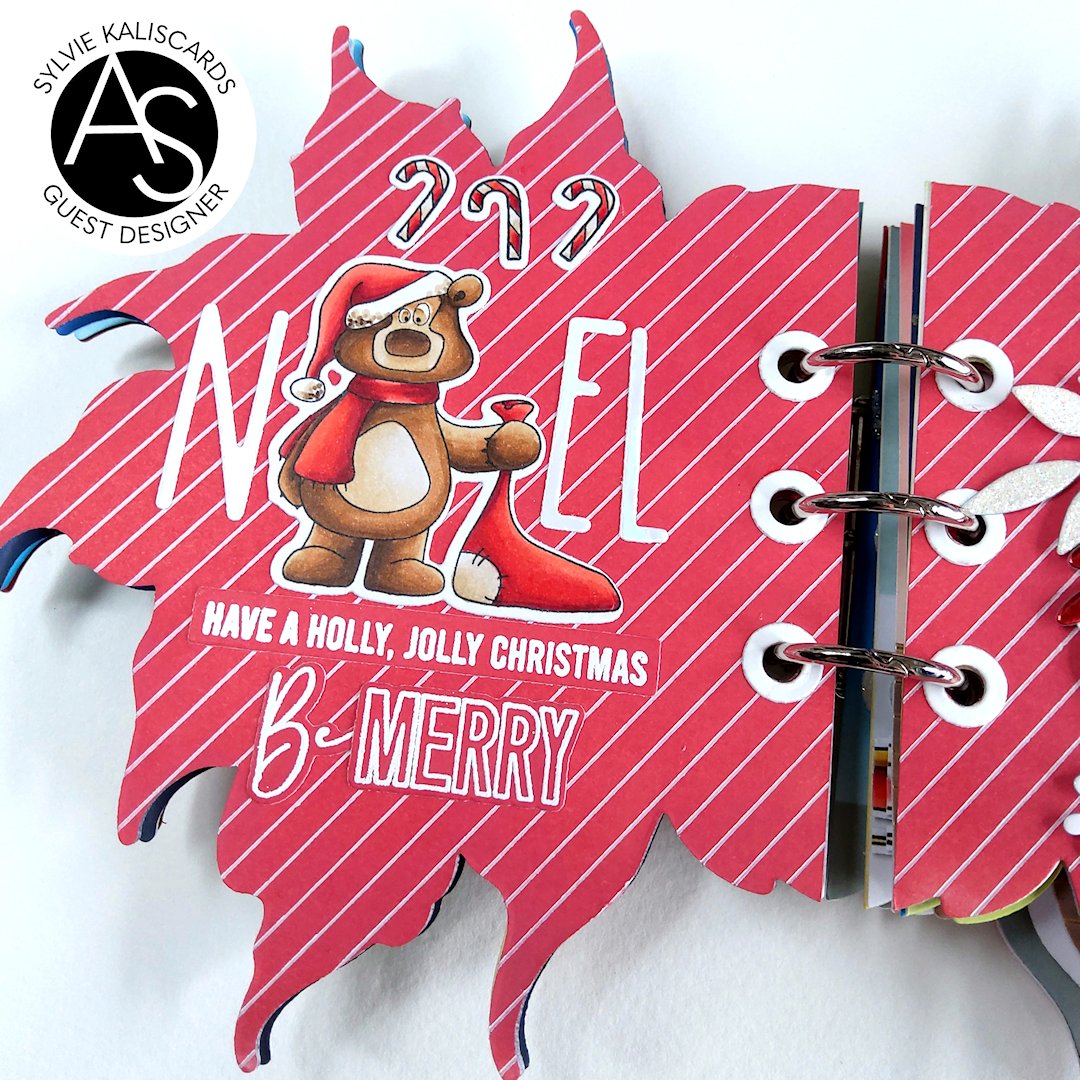

For the candy canes page, I inked the panels with Distress oxide Lumberjack plaid and then hot foiled them with the new Elegant stripes plate and Spellbinders glimmer foil Matte White.
I created the word NOEL from the Foxtrot alphabet and Santa bear from the birthday wonderland set. The sentiments are from the new Christmas sentiments and Festive poinsettia sets. I used cardstock inked with Lumberjack plaid distress oxide and heat embossed the sentiment with white powder.
On the right, I created a shaker by die cutting a polaroid shape from rectangle and square dies. I stamped the words Ho Ho Ho from the Happy Holidays words from the Christmas sentiments set.
The foliage behind the shaker are from the Summerbliss and Classic foliage die sets.
To finish the page, I added a few candy canes from the Smile and wave set here and there.
Products:
Elegant stripes hot foil plate
Birthday wonderland
Summerbliss die set
Classic foliage die set
Christmas sentiments (Have a holly, jolly christmas sentiment)
Foxtrot alphabet die (NEL letters)
Festive poinsettia (Be Merry sentiment)
Smile and wave (candy canes)
Falala


For this page, I stamped and masked the poinsettia from the new Festive poinsettia set. I then blended Distress oxides Twisted citron and Rustic wilderness. I then splattered gold watercolor from Hydracolor (nugget). To finish, I used the new Falling snow stencil to dab some white pigment ink and create a light bokeh effect. I unmasked the image and colored it with Copic markers.
For the images, I stamped and die cut them from the Falala friends and Festive poinsettia sets. I adhered the images with 3D foam and added some snow effect with a snow pen.
For the sentiment, I used the new Falala die set. I die cut the outline from a scrap of cardstock inked with Twisted citron and the word from Matte gold cardstock. The small Falala sentiment is from the Falala friends set.
Products:
Festive poinsettia (poinsettia)
Falala friends (critters and small Falala sentiment)
Falling snow stencil (bokeh effect)
Falala die (sentiment)
Stars are the limit


For this page, I blended Distress oxides Salty ocean, Prize ribbon, Chipped sapphire and Black soot. I then splattered silver watercolor, from Hydracolor (empress) and Copic Opaque white.
For the images, I used the new Falala friends set, as well as the Giraffe-ic friends and Birthday wonderland sets. The sentiment is from the Smile and wave set
Products:
Falala friends (gifts and wool cap)
Giraffe-ic friends (giraffe and clouds)
Birthday wonderland (hedgehog)
Tulips treasure (For you sentiment)
Smile and wave (sentiment)
Bunny gifts


For this page, I blended Distress oxides Tattered rose and Lumberjack plaid. On separate panels, I created that same faux wood effect as the Tiki bar, by dabbing in a straight line Tea-dye, Vintage photo and Ground espresso. I then used the Elegant stripes hot foil plate and Matte gold foil to add some veins. I die cut and trimmed the page to layer on the first panel as the floor.
I die cut the tag from the Signature tags die set and trimmed the bottom so it would fit on the poinsettia page. I stamped the bunny from the Falala friends set, masked it and blended Distress oxides Twisted citron and Rustic wilderness. I then stamped the sentiment from the Birthday wonderland set and heat embossed it with gold powder. Added a string of white and gold thread, glued some foliage from the Festive poinsettia set and adhered the tag with 3D foam.
On the right page, I created a little gift opening scene with the Spring bunnies and gifts from the Falala friends set.
Products:
Elegant stripes hot foil plate (ground)
Festive poinsettia (foliage)
Spring bunnies (small bunnies)
Falala friends (big bunny)
Signature tags die (tag)
Birthday wonderland (sentiment)
Choose joy every day


For this page, I masked the bottom part to create a snow area. At the top, I blended Distress oxides Speckled egg and Iced spruce. I then spread embossing paste with the new Falling snow stencil and let it dry.
For the little scene, I used the Falala friends, Smile and wave, Birthday wonderland and Pengu-tastic holiday sets. For the sled, I used my little "mirror stamping" trick, since all other images were facing opposite directions.
As for other pages, I glued some images and adhered others with 3D foam. I then added some snow here and there with a snow pen.
Products:
Falling snow stencil
Falala friends (wool cap, sled)
Smile and wave (penguin-reindeer, surfer penguin)
Birthday wonderland (seal)
Pengu-tastic holiday (dragged penguin)
Christmas sentiments (sentiment)
Happy New Year


Turning the last page and a new chapter! I created a new year's eve scene with the Underwater merpenguin wonders swimming in a sea of champagne. For the background, I blended Distress oxides Scattered straw, Mustard seed and Fossilized amber. I then dabbed white pigment ink with the Falling snow stencil to create a bokeh effect. As this was not very visible, I also heat embossed the small dot details from the Happy blooms set and also added Nuvo drops Gloss simply white to create the illusion of small champagne bubbles.
On the right page, I blended Distress oxides Tumbled glass, Salty ocean, Prize ribbon, Chipped sapphire and Black soot. For the ground, I then blended Iced spruce. I die cut cardstock from the new Snowflake layering die and used it as a stencil to create fireworks at the back with Nuvo glimmer pastes. The sentiment was stamped from the Festive poinsettia set and heat embossed with gold powder. For the penguin, I used different sets as listed below
Products:
Underwater wonders (pengu-mermaids)
Happy blooms (dot details)
Falala friends (caps and hat)
Pengu-tastic holiday (right penguin)
Paradise birds (cocktail)
Festive poinsettia (sentiment)
Snowflake layering die (fireworks)

Other supplies are listed below:
#tsukineko Memento inks #heroarts Unicorn pigment ink #inkadinkado Masking paper #distressoxide Speckled egg, Salty ocean, Scattered straw, Tea-dye, Vintage photo, Ground espresso, Salvaged patina, Chipped sapphire, Prize ribbon, Black soot, Lumberjack plaid, Twisted citron, Rustic wilderness, Tattered rose, Iced spruce, Mustard seed, Fossilized amber #distressink Squeezed lemonade, Pumice stone, Iced spruce #copic #copicliner #versamark #wowembossingpowder #sakura Gell roll pen #3DFoam #studiolight Effect snow #whitegouache #copicopaquewhite
#nuvodrops Gloss simply white and Gold coast #nuvoglimmerpaste Pink opal and Moonstone #spellbinders Glimmer foil Matte White and Matte Gold #hydracolor Empress and Nugget watercolor #altenew Embossing paste
#card #cardmaking #cardmakingofinstagram #cardmakerofinstagram #cardmakersofinstagram #handmadecards #diycards #diecutting #christmas #christmascard #christmasinjuly
WOW WOW WOW. What a project. It goes to show with a little patience and know how the sky is the limit with this release. I think I'm going to add the WRMemory makers crop a file thingy lol. You've certainly done a fantastic job here. It's also great to see that you've used products from other releases. The flamingos are great. In fact the whole project is just a great big fat WOW. X X
ReplyDeleteThank you so much ❤️
ReplyDeleteOh my goodness, so much talent in that mini journal! I absolutely love your creation, it's a work of art! I love the use of the ASD Festive Poinsettia die as the shape of the journal, so clever. Your artistic styling is beautiful. I'm fortunate that this Poinsettia set comes with stencils! Thank you for the awesome inspiration. I may give this a try, I think my mom would love it. ~Liana
ReplyDelete